iPhone Calendar Virus
When you are receiving random strange invites in your iPhone Calendar or surprisingly you received several unknown events reminders and you want to get rid of, though you are aware it’s a virus but don’t know how to fix the iPhone Calendar virus, then this article is for you.
Please do not click on the hyperlinks, it may steal your information or get you more infected. Let’s see how you can prevent them and avoid phishing exploits on your iPhone.
We assure you once you conclude the blogs you will not only able to remove the iPhone Calendar Virus but learned how you can stay secure online with your iPhone.
Our experts are much qualified to give the shut-up calls to that type of Phishing exploits because we are serving since more than a decade to our customers in the field of IT, telecommunication, and Cybersecurity.
Let’s begin to move ahead, but I think you should have some knowledge about it before removing the iPhone Calendar Virus.
The first question may comes in your mind, Can iPhone IOS infect with Viruses?
A Thumb rule we can say No.
Then, What is iPhone Calendar Virus and How it works?
Table of Contents
- Then, What is iPhone Calendar Virus and How it works?
- How to Get Rid of Calendar Virus on iPhone
- How to Remove Subscribed Calendar Virus from iPhone
- 1. Delete Spam Events by Using the iPhone’s Calendar App
- 2. Clear Calendar Virus from iPhone Settings
- Best Practices to Get Rid of iPhone Calendar Spam?
- 1. Be careful where you click
- 2. Review and change your calendar settings
- 3. Report the spam event as junk
- 4. Disable popups on Safari
- 5. Use a Secure DNS Server on iPhone
- Conclusion
We usually say iPhone calendar virus, but this is not a virus, it’s akin to a phishing emails technique. The Hackers send text messages, emails, web pages, and popups with links that look very associated with the actual link. And when the iPhone user by mistake jumps on the links, it keeps them in the Calendar app. Even if you press back or decline the event. unfortunately, iPhone’s default settings are not capable to block these hackers to send spam calendar events.
Technically speaking iPhone IOS shows a gap here because it allows anyone even those who are not added to your contacts, can send calendar invites to your iPhone. though the user isn’t expecting phishing links in the Calendar app, they might click on the link in the event, which quietly expect will lead them to a phishing page. These pages may contain hacking scripts and malware that could result in revealing your personal information and getting hacked.
How to Get Rid of Calendar Virus on iPhone
Apple is aware about the issue among iPhone users regarding iPhone Calendar Spam but till now they are not coming up with a satisfactory solution. Apple Support shares a Youtube video as a remedial action but unfortunately manually revoking the incoming invite is not sufficient further the hacker may identify that this email ID is valid resulting increase in the SPAM frequency.
How to Remove Subscribed Calendar Virus from iPhone
There are 2 Effective Ways:
1. Delete Spam Events by Using the iPhone’s Calendar App
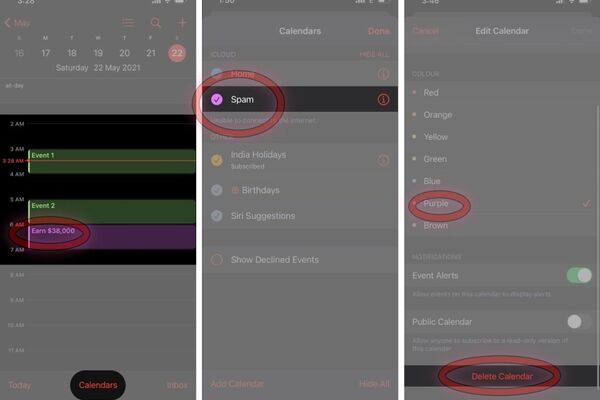
Open the Calendar app on your iPhone.
- You can go through all the events, including spam events. Note the color of the spam event invites.
- On the main page, tap the Calendars button at the bottom.
A list with all the calendars synced to your iPhone will show up. - Look for the spam event’s color and tap the “ i “ button next to it.
- Scroll down and tap Delete Calendar to delete all spam events from your iPhone.
Note: If spam calendar events are displayed with more than one color, perform the steps for those colors.
2. Clear Calendar Virus from iPhone Settings
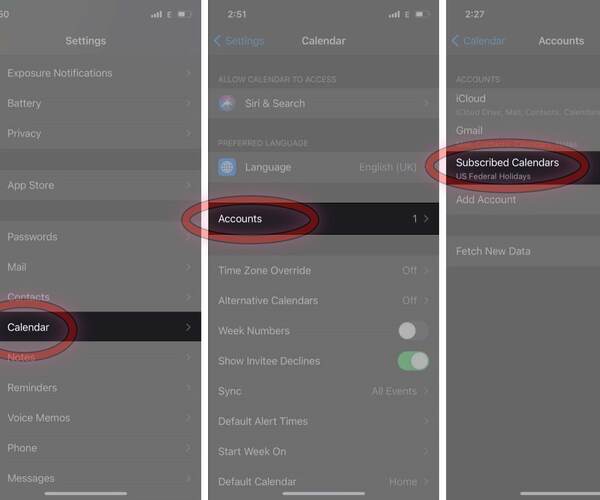
If you continue receiving spam events on your iPhone, you might need to unsubscribe from these events from your iPhone’s settings. Here’s how you can do it.
- Head over to iPhone Settings.
- Scroll down and select Calendar
- Next, select Accounts and tap Subscribed Calendars.
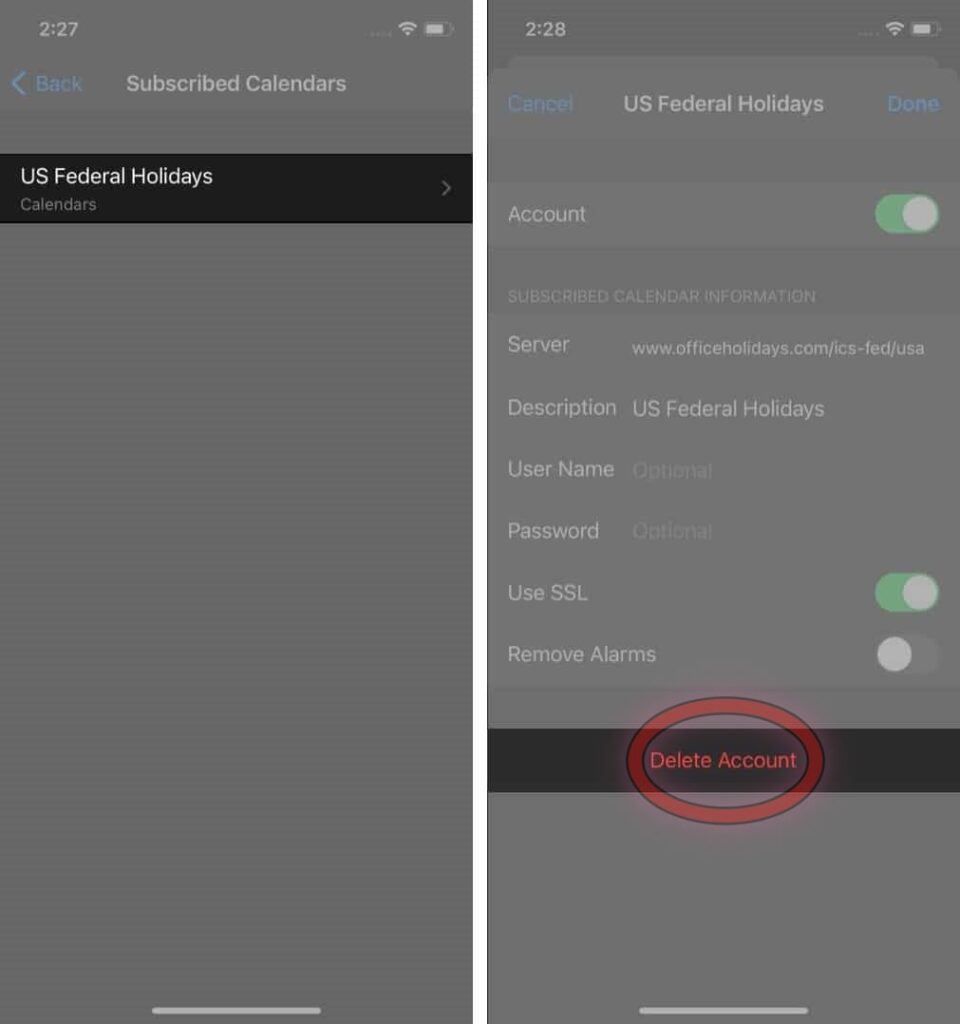
Select the calendar you did not subscribe to and tap Delete Account.
Best Practices to Get Rid of iPhone Calendar Spam?
- Be careful where you click
- Review and change your calendar settings
- Report the Spam event as junk
- Disable Popups on Safari
- Use Privacy focused DNS Server on iPhone
1. Be careful where you click
- Avoid clicking or tapping on links or opening attachments in unknown text or email messages.
- Carefully interacting with captchas.
- If you do receive a fake calendar notification
2. Review and change your calendar settings
- The first thing you should do to avoid calendar spam is by preventing notifications.
- Make sure that your iPhone is not set up to auto-accept calendar invites. To change your calendar settings:
- Sign into your iCloud account and select Calendar
- Click the gear symbol in the bottom left-hand corner of the app screen and select Preferences
- Hit the Advanced tab
- In the subsection called Invitations, click the radio button next to the “Email to [your email address]” option to make this setting your default one instead of “In-app notifications”
3. Report the spam event as junk
Reporting a calendar invite as junk will notify Apple about the spam events. Apple will then block the events from appearing on your and other users’ iPhones. To do so:
- Log in to iCloud.com on your Apple device
- Go to Calendar, select the spam event, and tap Report as Junk.
4. Disable popups on Safari
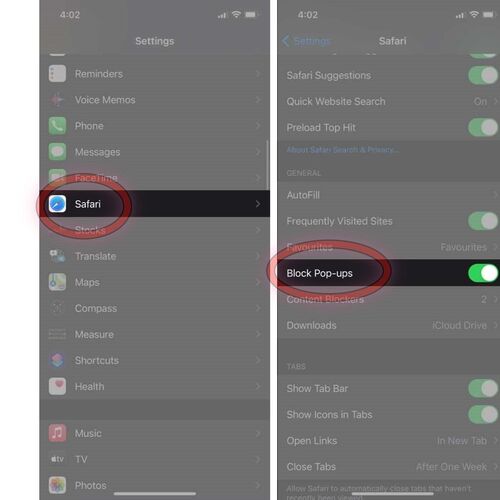
Most probably, these spam events enter your iPhone through Safari. These hackers use scripted popups to get the user to click them and then send spam events to your iPhone. Disabling popups on Safari will minimize this problem.
- Go to iPhone Settings.
- Select Safari.
- Enable Block Popups, if not already.
5. Use a Secure DNS Server on iPhone
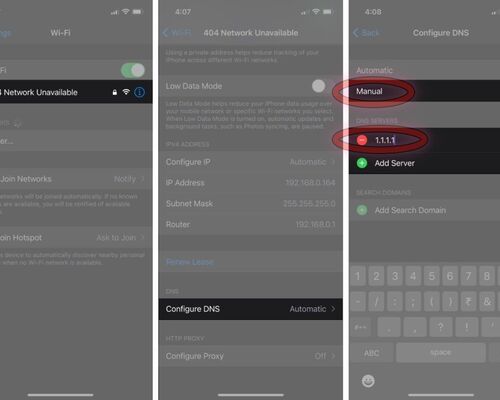
Using a Secure DNS Server on your iPhone will not only protect you from Calendar viruses but also other malware.
Cloudflare’s WARP is one such DNS service example that tracks malware and virus on the internet and prevents them from entering your iPhone. To set a custom DNS on your iPhone:
- Go to Settings and select Wi-Fi.
- Tap your Wi-Fi network’s name.
- Scroll down, select Configure DNS, and change the configuration from Automatic to Manual.
- Click Add Server and enter the DNS address (1.1.1.1 in the case of Cloudflare’s DNS address)
Conclusion
That’s all my friends. I hope you enjoy this blog. please share your experience after healthy learning. please don’t forget to share your feedback. stay blessed and wait for my next blog.
You may follow below links if you are willing to explore more topics
How to Block Known and Unknown Calls on iPhone
Read more:
- Solved: FaceTime Green Screen Background on iPhone, iPad or MacBook
- How to Block Known and Unknown Calls on iPhone
- Universal Control Not Working on Mac and iPad https
- How to Restart or Reboot and Reset an Apple Watch
- Why Do My AirPods Keep Disconnecting With Full Battery
- iPhone Calendar Virus
- Why is my Battery Yellow?
- How to Fix the ‘Cannot Verify Server Identity’ Error


