How to Fix the ‘Cannot Verify Server Identity’ Error

When you try to configure your Mail App but constantly get the error ‘Cannot verify server identity’ even though you entered all the information correctly in the Mail App. Don’t worry we are here to map the problem’s causes and how you can fix it permanently.
We assured you by the quick walkthrough you will achieve not only the quick fix but learned the perfect knowledge that can be useful in similar cases.
We have a team of experts having rich experience in IT & Telecommunication. Therefore we have a bunch of different ways to solve the errors. Let’s explore now.
Understanding the Error ‘Cannot Verify Server Identity’
Table of Contents
- Understanding the Error ‘Cannot Verify Server Identity’
- Hot Fix ‘Cannot Verify Server Identity’ Error
- Verify iCloud Mail App Setting
- iCloud Mail Server Settings
- Incoming Mail Server Setting
- Outgoing Mail Server Setting
- Force Restart Mail App
- Restart and Update the iPhone IOS & Carrier Settings
- Disable and Enable the SSL on iPhone
- Delete the Email Accounts on iPhone
- Add an email account to Mail on iPhone
- Verify the Mail Server is UP
- Ask for Support to Check & Verify Mail Server Settings
- Conclusion
Basically, this error pertains to SSL certificate validation. When your iPhone tries to validate the certificate to fetch the email securely and founds that the certificate doesn’t match the domain name or it may be expired or maybe not signed by the company, therefore it is marked as unreliable
This usually happens when you try to migrate or set up a new email account in your IOS device or change the mail server certificate. Every time when you made this change SSL server validation will take place.
Hot Fix ‘Cannot Verify Server Identity’ Error
- Verify iCloud Mail App Setting
- Force Restart Mail App
- Restart and update the iPhone IOS and Carrier settings
- Disable and Enable the SSL on iPhone
- Delete the Email Accounts on iPhone
- Add New Email Account on iPhone
- Verify the Mail Server is UP
- Ask for Support to check & verify Mail Server Settings
- Conclusion
Verify iCloud Mail App Setting
- iCloud Mail Server Settings
- Incoming Mail Server Settings.
- Outgoing Mail Server Setting.
iCloud Mail Server Settings
- iCloud Mail uses the IMAP and SMTP standards supported by most modern email client apps. iCloud Mail does not support POP.
- If you set up an account using iCloud System Preferences or macOS Mail in 10.7.4 or later, you won’t see these settings because they’re automatically configured.
Incoming Mail Server Setting
IMAP information should be as per the below format:
Server name: imap.mail.me.com
- SSL Required: Yes
(If you see an error message when using SSL, try using TLS instead.) - Port: 993
- Username: This is usually the name of your iCloud Mail email address (for example, smithrayan, not smithrayan@icloud.com). If your email client app can’t connect to iCloud Mail using just the name of your email address, try using the full address.
- Password: Generate an app-specific password.
Outgoing Mail Server Setting
Verify the SMTP information as per the below format:
- Server name: smtp.mail.me.com
- SSL Required: Yes
(If you see an error message when using SSL, try using TLS or STARTTLS instead.) - Port: 587
- SMTP Authentication Required: Yes
- Username: Your full iCloud Mail email address (for example, smithrayan@icloud.com, not smithrayan)
- Password: Use the app-specific password that you generated when you set up the incoming mail server.
Force Restart Mail App
keeping an app’s memory state in long-term storage might be the cause of malfunctioning therefore it’s better to close your in-memory apps as a quick way forward.
- Swipe up from the bottom of your screen until the app carousel appears.
- Swipe right until you find the mail app,
- and swipe the app itself up to kill it.
- Then open it again to see if that resolved the issue.
Restart and Update the iPhone IOS & Carrier Settings
One of the quick remedies for all initial issues is to apply a restart that can fix minor issues in the email app. And surprisingly it works wonders!
As well as, an update to the latest iOS. It is much important especially when you see there is the latest software update available for you.
To check the software update go to Settings, then tap on the Software update
Carrier Settings Update on iPhone
Then Next, update the carrier settings which is often important when the issue pertains to network settings.
To check the Carrier settings update tap on Setttings> General> About then scroll to the Carrier section
Disable and Enable the SSL on iPhone
Technically, it’s not recommended in general, but commonly we observed that most of the users get rid of this error by disabling the SSL (Secure Socket Layer) encryption for that account. However, if you do this it means that your emails can be viewed or compromised, so handle it carefully.
However, if it didn’t work, do enable it again to make it secure your email communication.
Below are the recommended settings for POP & IMAP SSL
- Settings,
- Click on “Mail, Contacts, Calendars.”
- Choose the email account you’ll be securing.
- Tap the email address listed beside “Account.”
- Select “Advanced.”
- Scroll down to “Use SSL,” it will be in the “Incoming Settings” section.
- Note: If using IMAP, select Server Port 993, for POP use 995.
No success yet! Don’t worry we are the champ. The below solution can be the real Hot Fix for the error “can not verify server identity”
Delete the Email Accounts on iPhone
Now we are going to apply our final move this could be one of all solutions for your most of your mail errors.
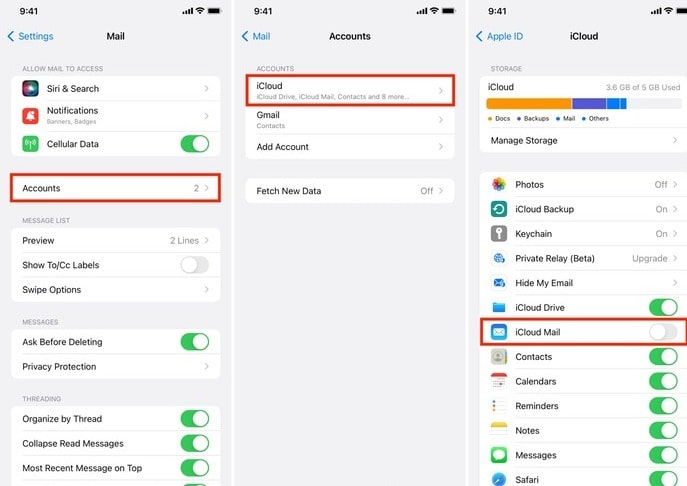
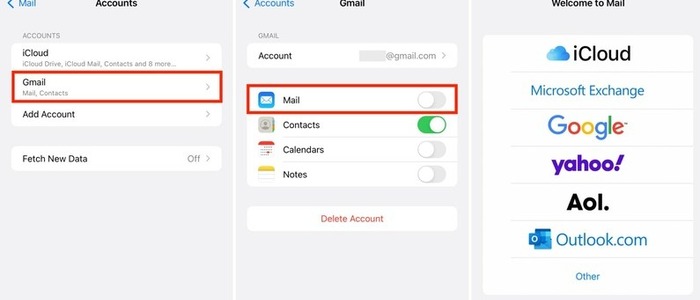
1) Open Settings and tap Mail.
2) Tap Accounts and choose the first account. usually, it’ll be iCloud. Tap iCloud once more and turn off iCloud Mail.
3) Now go back and tap your other added email account and turn off the switch for Mail.
4) Do this process until you have deleted all email accounts from the Apple Mail app. Now, when you open the Mail app, it’ll show the welcome screen, which means no account is active here.
5) Go to the Home Screen, long-press the Mail app, and tap Remove App > Delete App > Delete.
6) Restart your iPhone or iPad.
Add an email account to Mail on iPhone
1) Open App Store and search for Mail. You can also use this link to redownload the Apple Mail app.
To add an email account on your iPhone you can do this from Settings, > Mail, and then do the following.
1) On the Settings screen, select Mail > Accounts.
2) Scroll to the bottom and pick Add Account.
3) Select the type of account you would like to add from options like iCloud, Exchange, and Google. You can also choose Other to set it up manually.
4) Follow the prompts to connect the account which depend on the type of account you choose.
When you finish and open the Mail app, you’ll see the account listed under Mailboxes.
Verify the Mail Server is UP
If you are using a private mail server other than Google, Hotmail, or Yahoo. You may need to verify that your Mail server is really UP or it may have some temporary interruption in the services. This can only be confirmed by contacting your company’s IT support.
Ask for Support to Check & Verify Mail Server Settings
When you follow all the troubleshooting steps but are unable to rectify the problem that means there are some other parameters that can be missing in the configuration which should be correctly entered with the help of your company’s IT support.
Conclusion
I hope you enjoy the solution. Please let us know if we are doing well and what we should more focus on the relevant topics. Feel free to comment and share your feedback.
Read more:
- Solved: FaceTime Green Screen Background on iPhone, iPad or MacBook
- How to Block Known and Unknown Calls on iPhone
- Universal Control Not Working on Mac and iPad https
- How to Restart or Reboot and Reset an Apple Watch
- Why Do My AirPods Keep Disconnecting With Full Battery
- iPhone Calendar Virus
- Why is my Battery Yellow?
- How to Fix the ‘Cannot Verify Server Identity’ Error